Affichage des articles dont le libellé est tuto. Afficher tous les articles

mardi 19 août 2014

Be The First To Comment
      How to Edit the image at startup and closing in the Tomtom ?


  As usual before handling the TomTom, make imperative a backup!

   To crop and resize we will use the free XnView software
    XnView install software and run it. 

    Open your photo or image to crop (File / Open tab)

     Once the image is open, click on the "Edit / Proportion of selection" tab 
      • If you have a Tomtom with a screen of 3.5 inches (Tomtom GO 300/500/700, One v1 / v2 / v4,               Rider & Rider 2) select 4: 3 (1.33) 
      • If you have a Tomtom Screen with 4 or 4.3 (Tomtom One XL, GO 510/710/910, GO 520/720):              Select 16: 9 (1.78)

   
  How to Edit the image at startup and closing in the Tomtom ?


 You will define the image portion to crop: 
   Place the mouse cursor at the starting point of your marquee. 
 While holding the left mouse support, drag the mouse cursor; the marquee will form. 
 Once selected, you can drag (move) this selection by putting your mouse cursor in the middle of the               selection and now pressing the left mouse click.

          
  How to Edit the image at startup and closing in the Tomtom ?


  If ever the trimming frame is not moving as it should (portrait instead of landscape) 
 Click the Edit / Selection tab - Reverse width & height. 

 To crop the image: 
 Click the "Edit / Crop" tab

   
  How to Edit the image at startup and closing in the Tomtom ?

  How to Edit the image at startup and closing in the Tomtom ?

    
We will resize it so that its size matches the screen Tomtom.
      Click the "Image / Resize" tab


 In the window that appears: 

Uncheck "Keep aspect ratio" 

• If you have a Tomtom with 3.5 inch screen (Tomtom GO 300/500/700, One v1 / v2 / v4, Rider & Rider 2), indicate the screen size: width 320 x height 240 pixels 

• If you have a Tomtom Screen with 4 or 4.3 (Tomtom One XL, GO 510/710/910, GO 520/720), indicate the screen size: width 480 x height 272 pixels 

Confirm with "Confirm"


Specificity of Tomtom with 3.5 inch screen (Tomtom GO 300/500/700, One v1/v2/v4 et Rider 1 & 2):

 We'll have to rotate the image 90 degrees clockwise before saving: 
  Picture tab / Rotate / Right 90 °

  How to Edit the image at startup and closing in the Tomtom ?

   It remains only to save the file in BMP format: 

  How to save the image at startup and closing in the Tomtom ?


  Click the Tab "File / Save"


  How to save the image at startup and closing in the Tomtom ?


  Import (or) files) images) in the TomTom : 

  Connect your TomTom to the computer; it is recognized as a mass storage device. 
  Copy (or) file that you just created and paste it to the root of Tomtom 
   An alert message will ask you to overwrite existing ones conformation: enter YES.

  How to save the image at startup and closing in the Tomtom ?

  Disconnect the Tomtom of the computer; Please care that the Tomtom no longer works! More red  cross on the screen .


 To disconnect: 
 use Tomtom Home  => function "Eject Tomtom" 
 or use the "Remove Hardware Safely" (in the task bar at the bottom right) function.


   The images will be displayed automatically on startup and closing Tomtom; there is nothing to        configure.


mercredi 6 août 2014

Be The First To Comment

how to install multiple maps on tomtom GPS or garmin 255 2xx 

   here is the procedure for installing multiple cards on the Garmin nuvi 255 gps or TomTom gps :
                                            
                                           
Garmin GPS

                             
   . Things to know before starting : 

- Garmin or TomTom support memory cards sd 2gb or 4gb sdhc 
- The maps are in *. img .
- The gps recognizes two types of internal memory at the same time and other external 
- The cards should be in a folder name "Garmin" or "TomTom" and the card should be named                      "gmapsupp.img". 
- we can put a card name "gmapsupp.img" in the internal memory of the GPS and another name                        "gmapsupp.img" in the "Garmin" or "TomTom" folder in sd card external gps.

.  In europe or america map, you have to buy a memory card 4GB SDHC and in Africa you have to buy a        memory card 2GB SDHC :

1)  format the card in FAT32 (very important) .
2)  create a folder named "Garmin" or "TomTom"
3)  Download map in *. img for convenience choose unlocked img (free map)
4)  copy the downloaded file in the garmin or tomtom folder (the name of the card must be           "gmapsupp.img")

     And now in the gps go to menu> setting> Map> Mapinfo.
      you will see 2 cards, check it .

samedi 19 juillet 2014

Be The First To Comment

                                          Using TomTom GO


TomTom Go


 TomTom GO starts by displaying the navigation view. The screen will appear in black and white until your TomTom GO locates your current position. Once this is done, the navigation view is shown in full colour. In future, your position will be found much faster, normally within a few seconds. Everything on TomTom GO can be accomplished easily using just your finger on the touch screen. Importantly, you can bring up the main options menu by tapping your finger somewhere in the middle of the screen.


How to plan your first route


1. Move outside, if you haven't already done so, so that the GPS hardware can locate your position. This may take some time, and will happen more quickly if you remain stationary. The screen displays your current position on its map, represented in a '3D' navigation view, from a driver's perspective. When you start moving, the navigation view will match the streets outside as you would see them through your windscreen.

2. Bring up the main menu. Use Arrow-head a few times to browse through all the different things you can do, then choose 'Navigate to... to start planning your first route.

3. Choose 'Address. You'll see a standard keyboard, used for entering place names (e.g. towns, streets and favourite locations). Above the keyboard is a small browser window in which your TomTom system will present locations from its database.

4. The best way to see how your TomTom system works is to use it for real, so think of the address that you want to visit and enter the first few letters of the place. Be as specific as possible. As you type, the letters are compared to the built-in list of possible names and any matches appear in the browser window.

5. When you see the name of the place you want, select it. A new browser window is now shown, this time with the prompt 'Street:' at the top. As before, start entering the road name of your destination.

6. When you see the name of the street you want, select it. A third and final keyboard and browser are shown, this time for you to select a house number. For some roads (such as those that don't have house numbers), you'll be asked to select a particular 'Crossing:' (i.e. an intersection). Select a crossing, or enter the house number and then choose 'Done'.

7. The fastest route from your current position to your destination is then calculated. This should only take a few seconds and its progress is shown on the screen. When done, a summary is shown, on a suitably scaled map.

8. Select 'Done' and you'll find yourself back at the main navigation view, but with the route now clearly coloured in for you. 


Helping with your journey

That's the planning all done, so simply buckle your seat belt and drive. As you approach a specific turn in the calculated route, your chosen voice will tell you what to do. For example, "In 100 metres, turn left", followed by "Turn left", without you having to take your eyes off the road. As you travel, following the voice instructions, you'll notice that the navigation view is updated constantly, always showing coming roads and junctions and presenting the best route to you.
Don't worry if you miss a turn or drive down the wrong road. A new fastest route will be calculated automatically, based on your new position and direction of travel. Wherever you go, it will always give you instructions that will take you to your chosen destination.


jeudi 17 juillet 2014

1 Comment
                                What's new in the latest version of TomTom Home?


        List of latest features and improvements 

        Version 2.9.8.3423 / 2.9.8.2330 (Mac)
         This version brings some minor improvements in the payment process.

         Version 2.9.7.3256 (Windows) / 2.9.7.2119 (Mac)
          This release adds support for the communication system Uconnect 5 "Radio Nav Fiat Group.
       
         Version 2.9.6
          . Several performance enhancements and bug fixes have been made. 

      Version 2.9.5
          . This update fixes an installation problem zones map. 

         Version 2.9.4
          this version has improved the process of backing up and restoring your data.
          .  this version has improved the billing process when buying cards or services.
          Several performance enhancements and bug fixes have been made.     
          
          Version 2.9.3
              To be sure you always enjoy the content and free services corresponding to your GPS, we now                     ask you to login to your account when you use HOME.  
       Several performance enhancements and bug fixes have been made.    
      
       Version 2.9.2
        this version has modified the messages recommending not disconnect your navigation device or                      memory card during the update, backup or restore your device and when copying items from                        your device to the computer or vice versa.
        this version has improved backup, association with a GPS and offer our content management                        system processes. 
        
        Version 2.9.1
             this version has improved the recognition of your navigation device via TomTom HOME. 
         Several performance enhancements and bug fixes have been made.

             Version 2.9
              this version has improved the installation wizards for Windows and Mac.
              . In this version, the following aspects of the log stream has been improved :
                      Page account creation has been improved. 
                      .  The account login page has been improved. 
                      The confirmation page login account has been improved. 
              this version has improved the explanation of the data you share with TomTom and parameters                       necessary to agree to share the data on your device.
              Recommendation of the voice of Darth Vader.

mercredi 16 juillet 2014

1 Comment

how to install the latest updates from TomTom ?


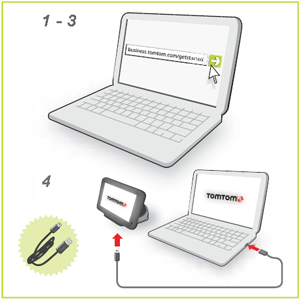
     1. Install my tomtom.
         
         If you have not yet installed the MyTomTom software on your computer, please read the FAQ: "MyTomTom" .

Install your tomtom with your computer


    2. Connect your navigation device to a computer and start it.
        
        MyTomTom starts automatically as soon as a navigation device TomTom PRO supports is                         connected to your computer and notifies you if updates for your navigation device exists.

    3. Download and install the update. 

        If MyTomTom does not check for available updates automatically, click Obtain new items. 
        A window opens and lists the available evidence. 

        Click Start Download. Thank you not disconnect your device until the update does not complete and              that it will not be restarted.
      
     4. Reset your navigation device. 
         
         Press and hold the On / Off button until you hear the sound of the drum and the machine restarts.                 This can take up to 30 seconds.
        
      5. Test your appliance outdoors.

          It is generally not possible to get a GPS signal inside, so take your device outdoors in clear view. Get             a satellite signal for the first time after installing the update can take up to five minutes. 

         To confirm the correct reception of the GPS signal, you can check the status on your GPS device.


© 2011 TomTom GPS - Designed by Mukund | ToS | Privacy Policy | Sitemap

About Us | Contact Us | Write For Us